This is my interpretation of how to use multiple Android Studio modules to create an Android codebase with good separation of concerns and a clean architecture.
Introduction
A module refers to a separate component of a software system that performs one function, often with several modules making a whole system. In Android Studio terms a module has a type, such as Android app, Android library, Java library, etc. When you create a new Android app using AS you get one module by default, named app, and all the code, UI and tests go in this one module.
Issues
Although the single module approach is acceptable, it can lead to a blurring of boundaries between layers of the app, or even mistakes being made as to which components are used in which parts of the app. This can then lead to a breakdown in separation of concerns and more ‘spaghetti code’.
Take for example the use of data structures. Ideally you should use different data structures in your ‘backend’ code to the data structures in your ‘frontend’ code (I’m using simplified terms here until I describe the modules I use). This is because your backend structures probably contain annotations related to serialisation/deserialisation or are in a particular ‘shape’ defined by the backend database or api. Whereas the data structures that are used in the ui will be in the shape that you need them for the ui. When all this code is in one module it is possible to accidentally use any of these data structures in any layer of the code, even if the structures are in different packages. (Kotlin doesn’t support package protected visibility, and even if you are using Java, package protected is not really enforceable.)
A better way
I will implement a simplified clean architecture using three layers:

UI or Presentation
This layer has all the Android UI components like Activities, Fragments, ViewModels, etc.
Domain
Contains all the business logic of the app. This layer has no Android components in it.
Data
All components related to data such as database, networking, api, shared preferences. It is an Android specific layer.
Each of these layers will be in their own module in AS. It is also necessary to create a fourth module called app which is used to bootstrap the application. Let’s take a closer look at each of the modules.
Module structure
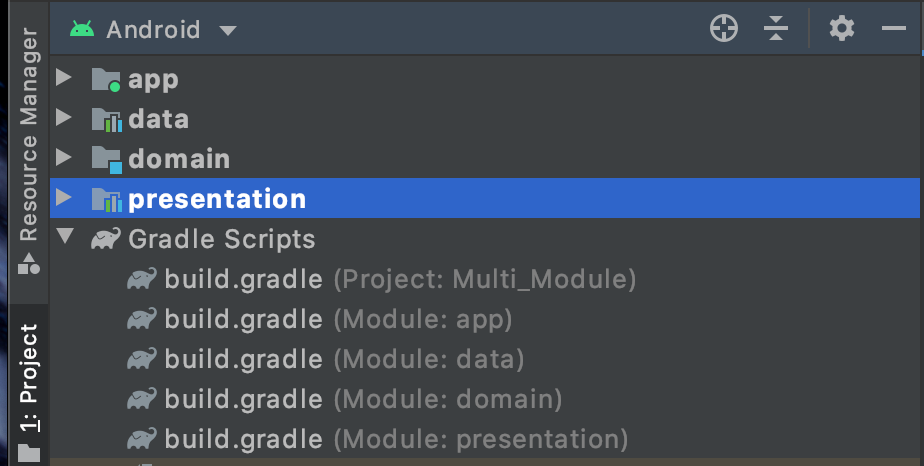
This is how the modules look in the project tab of AS. You can see the four modules app, data, domain, and presentation, along with their associated gradle build files. Note there is also a fourth gradle build file called Multi_Module which is the project level gradle file for this project. Also you can see from the icon on each module folder that the modules are of different types.
apphas a green circle on the folder indicating that it is an Android application moduledataandpresentationare Android library modulesdomainis a pure Java/Kotlin library
It is important to set the dependencies between each of the modules correctly, this is set in each modules’ gradle file, and is represented by this diagram:
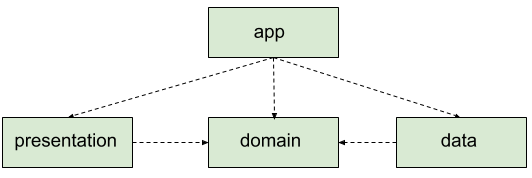
As you can see above, the app module depends on all of the other three modules, the data and presentation modules both depend on the domain module, and the domain module has no dependencies. The reason for these dependencies is discussed later in ‘Module contents’.
Creating the modules
I’ll describe here how to setup this project structure and how to set the dependencies. If you know how to do this you can skip to the next section.
We’ll start with the app module. Create a new project in AS as normal, choosing the ‘No Activity’ template. This will create the app module as an Android application. Also add a new Kotlin class to the module and make it extend android.app.Application, then add this class name to the android:name attribute of the <application /> tag in the AndroidManifest.xml file. In my example project I have called the application class MultiModApplication so the manifest file looks like this:
<manifest xmlns:android="http://schemas.android.com/apk/res/android"
    package="com.tunesoftware.multimodule">

    <application
        android:name=".MultiModApplication"
        android:allowBackup="true"
        android:icon="@mipmap/ic_launcher"
        android:label="@string/app_name"
        android:roundIcon="@mipmap/ic_launcher_round"
        android:supportsRtl="true"
        android:theme="@style/AppTheme" />

</manifest>
That’s all that’s needed for this module until we add the DI initialisation.
Next we’ll create the domain module. Create a new module from the project structure view and select the type as ‘Java or Kotlin Library’, give it the name domain. This will create a module with type java-library with just a single class in it with whatever name you gave it.
Repeat the above steps for the remaining two modules, but choosing type ‘Android Library’ and naming them presentation and data.
You should now have a project structure the same as the module structure screenshot earlier in this post.
Now we’ll set the module dependencies.
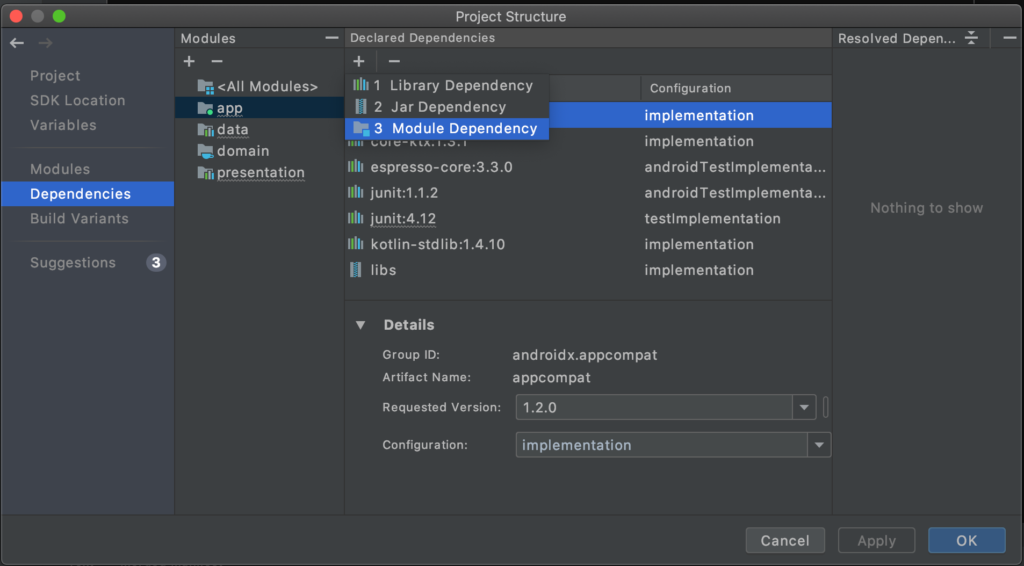
Open the Project Structure dialog (Cmd-;), select dependencies on the left then select the app module. Click on the add dependency button (+) and select ‘Module Dependency’:
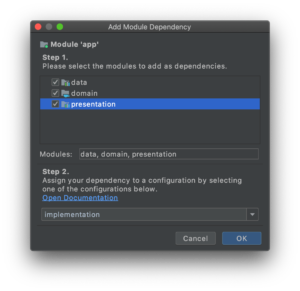
Select all three other modules and click OK:
Next select the data module and add a dependency to the domain module. Then select the presentation module and also add a dependency to the domain module.
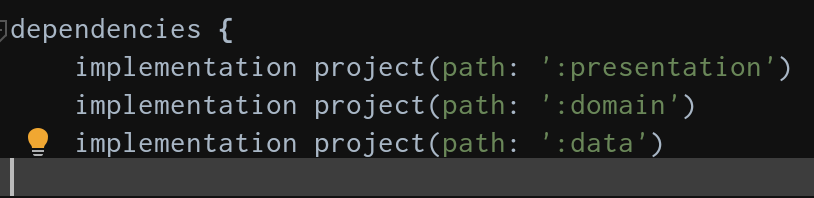
If you look at each module’s gradle file now you should see the correct dependencies to the other modules. For example here’s part of the app modules gradle file:
Module contents
- App module
The app module exists purely as the starting point for the app, that is why it is an Android application module. The only code this module contains is the application code which is used to initialise the dependency injection graph (this is why the module has dependencies on the other three modules – it needs to see their DI code).
There are very few files in this module, and once setup you normally don’t touch this module again. The files it contains are: AndroidManifest.xml, a strings.xml containing the app name, styles.xml containing the app style, colors.xml containing the main app colours used in the app style, the app icon files, and the main application class which extends android.app.Application.
- Presentation module
The presentation module is where you’ll add all the Activities, Fragments, ViewModels, and any other Android UI related code such as custom views/components; plus their associated resources. It is an Android library module.
The ViewModels contain the UI logic and interacts with the use cases (or interactors) in the domain module to perform data operations, this is why this module has a dependency on the domain module.
This module is highly testable, both UI tests (e.g. Espresso), and unit tests. It is important to keep Android code out of the ViewModels to make them easily unit testable.
- Domain module
This is a very interesting module, it is a pure Java/Kotlin library i.e. it contains no Android code whatsoever, and it contains all the business logic for the app. It has no dependencies on the other modules and in theory could be compiled into a .jar and used in any other JVM application.
The three main types of objects the domain module contains are
-
- Data classes. These are the business model data classes that the UI layer of the app uses.
- Repository interfaces. These define the contract between this layer and the data layer. The
domainmodule doesn’t need to know about the implementation of these interfaces, it just defines the data flows. - Use cases. A use case performs a distinct unit of work (examples could be get a list of items or get an item’s details). They are called by the ViewModels in the
presentationmodule and use the repository interfaces to communicate with a data layer. These are highly unit testable.
- Data module
As you would expect, this module is all about data. It gets and sends data to servers, reads and writes data to the database and other local storage, and maps data from an internal format to the domain format. It contains a lot of Android specific libraries such as Retrofit, Room database, and shared preferences.
The main components to note here are the repositories which are responsible for marshalling all the data to and from the right datasource. These repositories conform to the interfaces defined in the domain module. The data mapping classes that the repositories use are very easy and important to write unit tests for to ensure the correct data is getting passed to the domain.
Check it works
To check it all builds and runs we can add an Activity and run it on an emulator.
Right-click on the lowest folder in the presentation module and choose New->Activity->Gallery… then select ‘Empty Activity’ and name it MainActivity. That will also add the Activity to the manifest, but we need to set it to be the launch Activity. Edit the presentation manifest and add these lines in the Activity tag:
<activity android:name=".MainActivity">
    <intent-filter>
        <action android:name="android.intent.action.MAIN" />
        <category android:name="android.intent.category.LAUNCHER" />
    </intent-filter>
</activity>
If you run the app now it should build ok and you’ll see the app on the emulator.
Conclusion
This is one way of achieving a multi-module Android app. I’ll cover the internals of each of these modules in a later post, to show how I think clean architecture can be achieved very effectively with this module configuration.
I also haven’t covered feature modules or dynamic feature modules, I’ll save that for some other time.